[Learning] OpenPetya: A Proof-of-Concept of Petya Ransomware
Last Update:
Word Count:
Read Time:
Background
Last month, I posted two articles analyzing both Petya and NotPetya.
Before that, I also wrote an article introducing MBR and bootloaders:
Afterward, I published another article and released a project focused on understanding how bootloaders work:
Recently, I have been learning how rootkits and bootkits work by studying two books: Rootkits and Bootkits and PC Assembly Language. After studying them, I decided to further explore how Petya operates internally. Therefore, I also started studying Serious Cryptography and began developing a customized bootloader inspired by Petya’s design.

Petya and NotPetya really impressed me because of their low-level implementation techniques. This is one of the reasons why I have spent so much time studying them. I believe that the best way to truly understand how they work is through hands-on practice.
While trying to learn their underlying principles from online resources, I found that many of them were insufficient for in-depth learning. For example, some articles only briefly explain the overall workflow, while some GitHub re-implementation projects simply reuse extracted MBRs and bootloader binaries from the original malware samples.

Therefore, OpenPetya serves as a pratical demonstration of my ongoing research into bootkits, low-level system internals, and ransomware design.
Introduction
OpenPetya is a proof-of-concept implementation inspired by Petya ransomware, fucusing on MFT encryption using Salsa20 and password validation mechanisms.
OpenPetya does not aim to exactly replicate either Petya or NotPetya. However, several important concepts and functionalities are implemented:
- Custom MBR: OpenPetya uses custom MBR to load the stage-2 payload
- Custom bootloader: The bootloader contains the core logic, including Salsa20 encryption/decryption, password validation, and the user interface
- MFT encryption: Similar to the original Petya, OpenPetya encrypts critical NTFS MFT sectors using Salsa20
- Key validation: Since Salsa20 is a stream cipher, decrypting with an invalid key would permanently corrupt the MFT data. Therefore, validation is required before decryption
- MFT decryption: The encrypted MFT sectors are decrypted after successfuly password validation
- Restoration: After recovery, OpenPetya restores the original bootloader and removes itself automatically
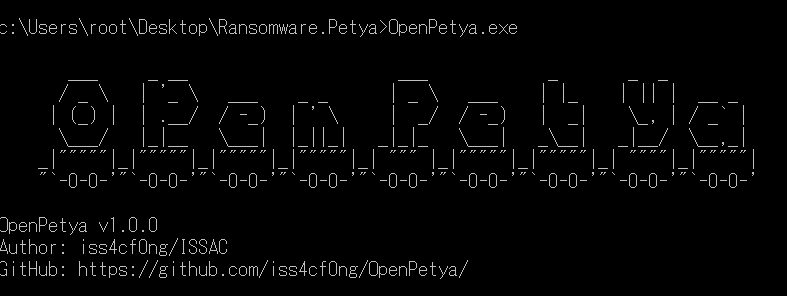
GitHub repository: https://github.com/iss4cf0ng/OpenPetya
If you find this project helpful or informative, I would truly appreciate a ⭐ on the repository. Your support would be a great motivation for me to continue improving this tool.
Disclaimer
This project was developed as part of my personal interest in studying cybersecurity. However, it may potentially be misused for malicious purposes.
Please do NOT use this tool for any illegal activities.
The author is not responsible for any misuse of this software.
Compile
You can build the project with the commands below.
1 | |
Usage
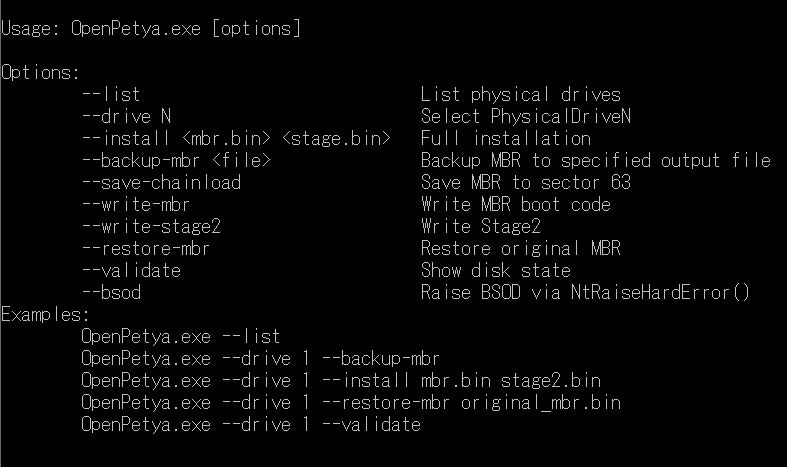
1 | |
Demonstration
How Does Petya/NotPetya/OpenPetya Works?
In this section, I would like to explain more than the internal workflow in more detail than in my previous analysis articles.
If you are interested in the earlier posts, please refer to the related articles below:
Regardless of whether it is Petya, NotPetya, or OpenPetya, the sophisticated functionalities, such as Salsa encryption and password validation, are primarily implemented in C or other high-level languages rather than pure Assembly code.
Petya and NotPetya
Petya was discovered in March of 2016 and demonstrated how ransomware could be implemented using bootkit techniques.
Petya encrypts critical MFT structures. On the other hand, NotPetya encrypts not only user files before triggering a BSOD, but also a much larger portion of filesystem metadata. This is probably one of the reasons why NotPetya’s encryption process takes significantly longer.
OpenPetya
OpenPetya consists of three major components:
OpenPetya.exe: The user interface and installer application- mbr.bin: The custom Master Boot Record (MBR) used to load the stage-2 payload
- stage2.bin: The stage-2 bootloader responsible for encryption, decryption, validation, restoration, and the ransomware interface
OpenPetya.exe acts as a user-mode installer and controller application responsible for infecting the target device. It also demonstrates the usage of undocumented Windows APIs such as NtRaiseHardError().
It is worth mentioning that OpenPetya does not include Command-and-Control (C2) functionality. In addition, OpenPetya stores plaintext MFT backup data inside hidden sectors after encryption. This behavior is intentionally designed for educational purposes because those features are relatively trival compared to the core bootloader and cryptographic mechanisms implemented in this project. However, you can still modify or remove these features if necessary.
Workflow
The high-level overview is shown below:
The installation phase is shown below (after rebooting):
The encryption workflow is shown below:
Lastly, the login and recovery workflow:
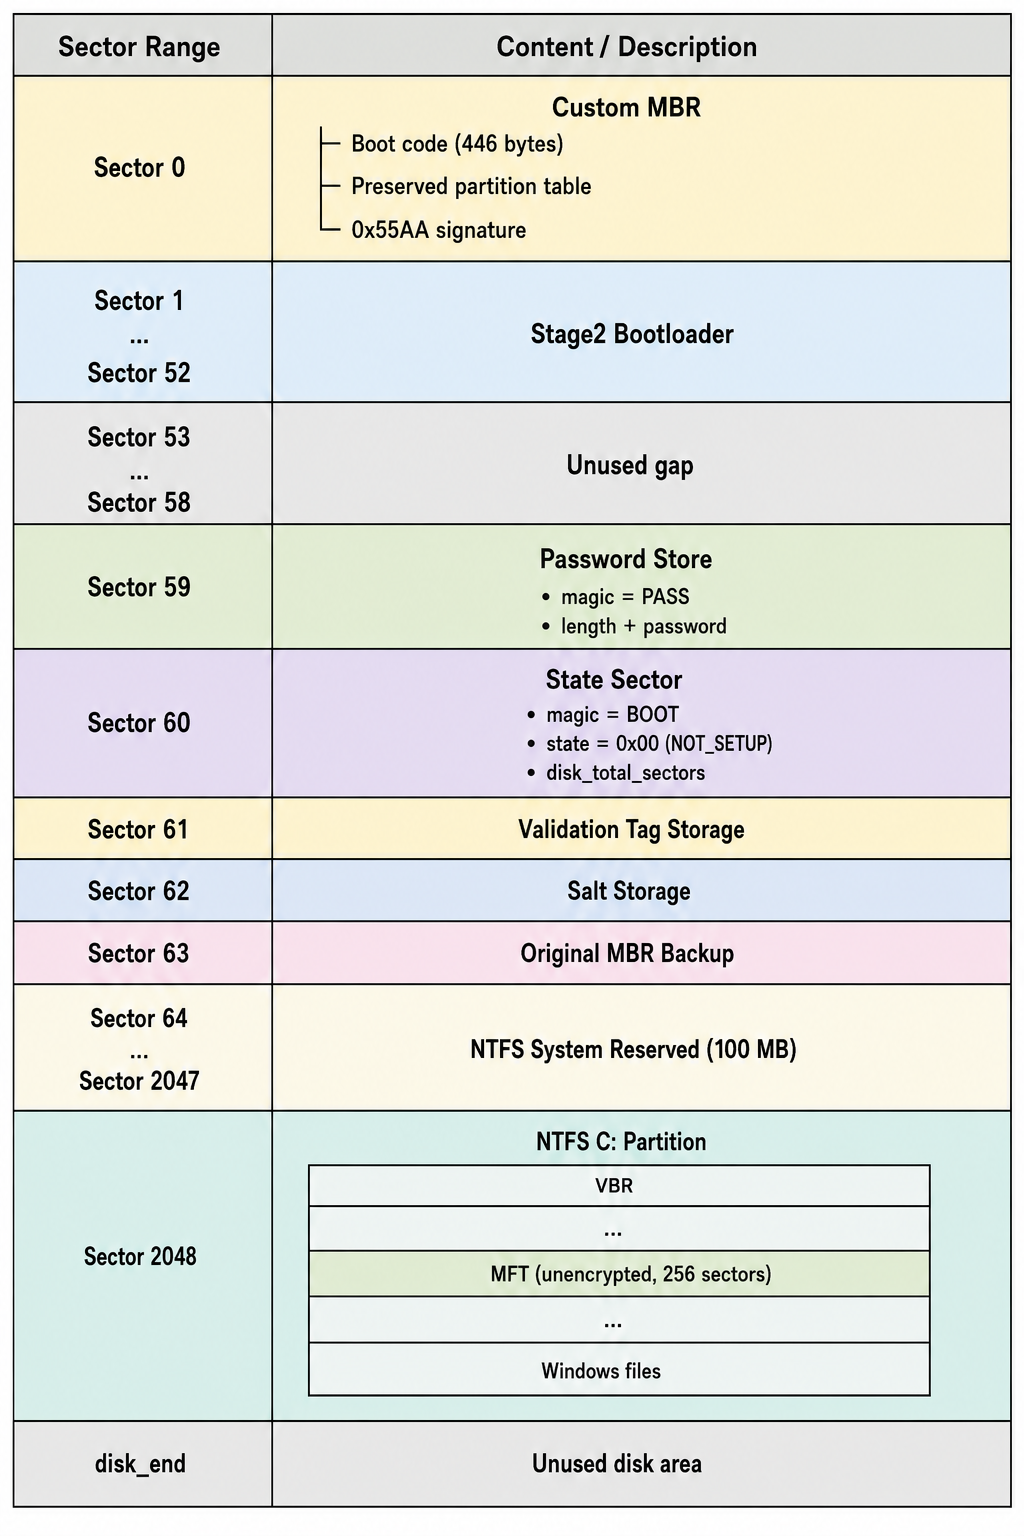
Disk Layout
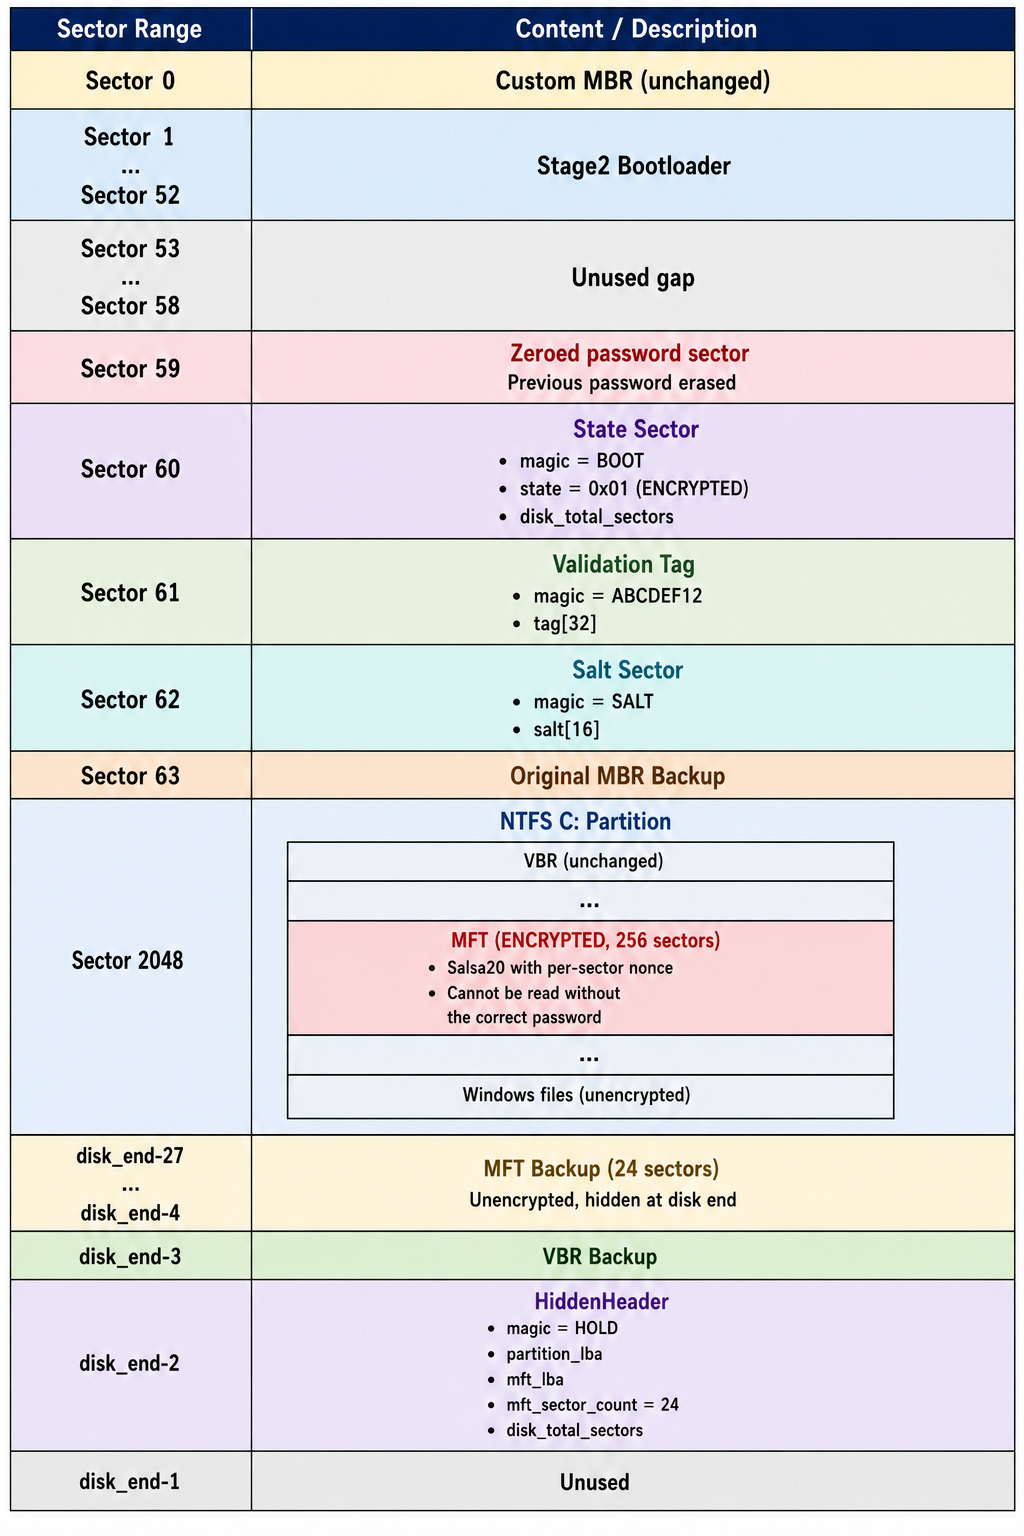
After infection (by OpenPetya.exe) but before rebooting, the disk layout is shown below:
After infection and rebooting, the MFT partitions are encrypted using Salsa20:
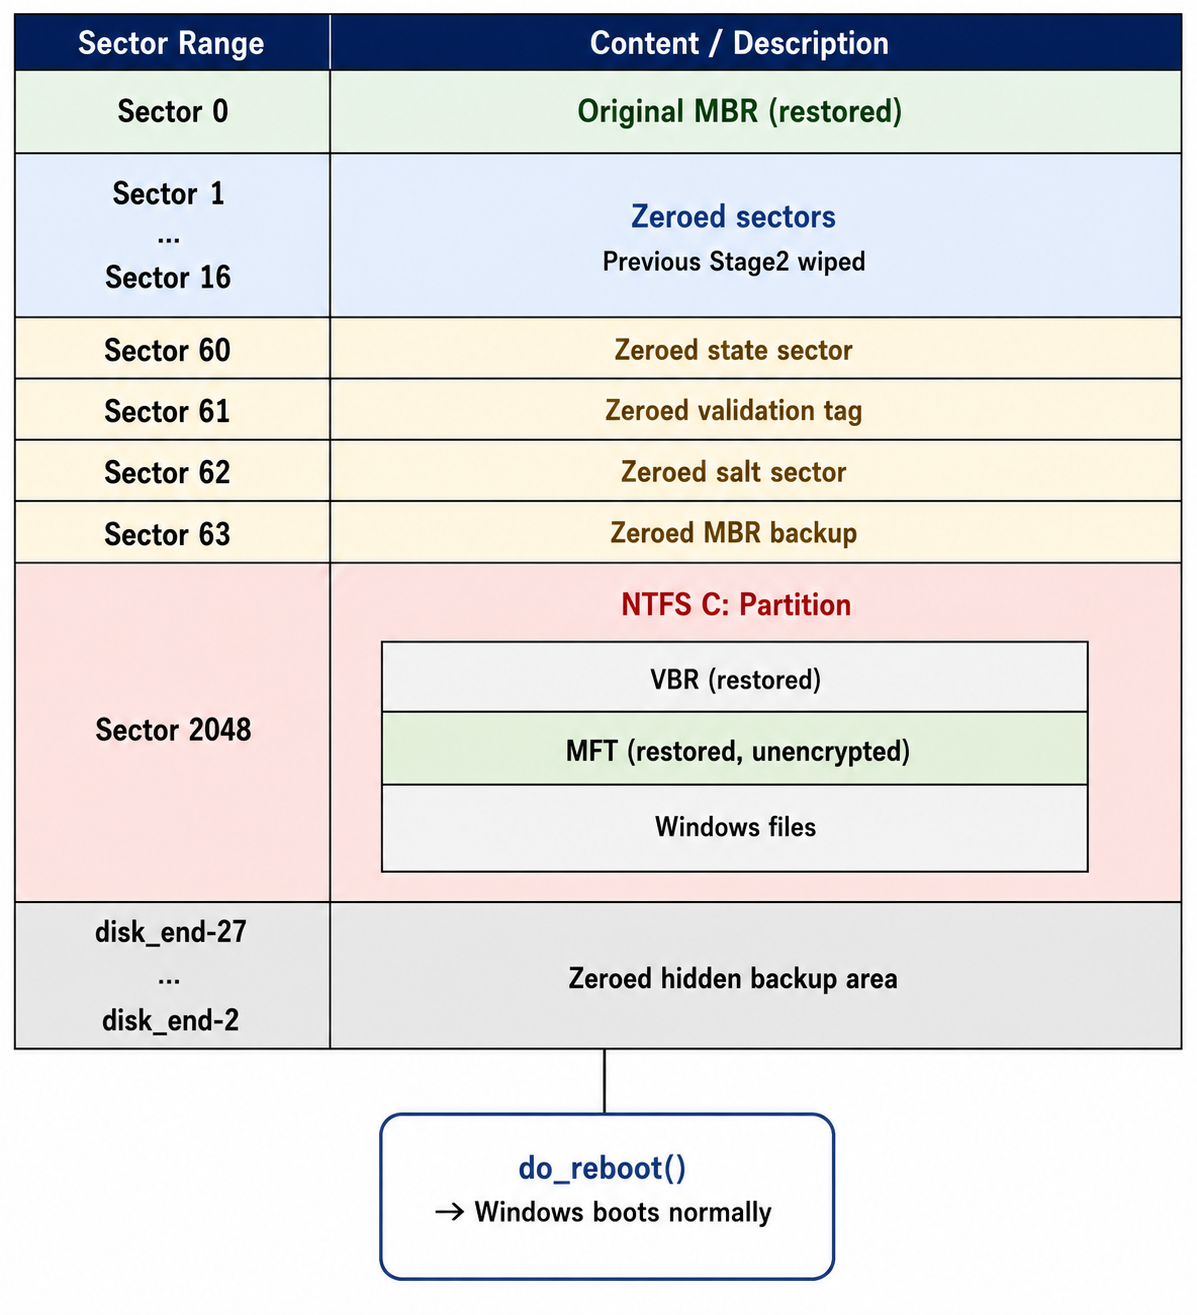
After recovery, the disk layout becomes:
Master File Table (MFT)
The Master File Table (MFT) is one of the most critical structures in NTFS filesystem. It stores metadata of almost every file and directory on the partition, including:
- File names
- File locations
- Timestamps
- Security attributes
- Cluster mappings
Even system files required during booting, such as kernel images, drivers, registry hives and Winlogon-related components, are all referenced through the MFT.
When the MFT is encrypted, the Windows bootloader and NTFS driver can no longer correctly locate or interpret filesystem metadata. Consequently, essential system files cannot be found, making filesystem parsing fails. Eventually, Windows boot process becomes impossible.
This is the reason why Petya does not need to encrypt every file individually. By encrypting only a portion of the MFT, the entire NTFS partition effectively becomes inaccessible.
How Does OpenPetya Work?
First, the installer (OpenPetya.exe) backs up the original MBR and stores it in sector 63. It then overwrites the original boot sectors with the custom MBR and stage-2 bootloader binaries.
The installer asks the user to define a password for Salsa20 encryption and stores the plaintext password in sector 59 temporarily.
Users (or victims, in this experiment) can either reboot the machine manually or trigger a BSOD using the provided functionality implemented through NtRaiseHardError().
After rebooting, the custom bootloader is executed. It first checks the setup state stored in sector 60 to determine whether the MFT has already been encrypted.
If the system is not yet encrypted, it enters the encryption phase.
1 | |
256 sectors of NTFS MFT are encrypted using the Salsa20 stream cipher and the user-defined password.
1 | |
After encryption, the bootloader erases the stored plaintext password, writes the encryption state to sector 60, and reboots the machine.
1 | |
For safety and recovery purposes, plaintext MFT backup data is also stored inside hidden sectors.
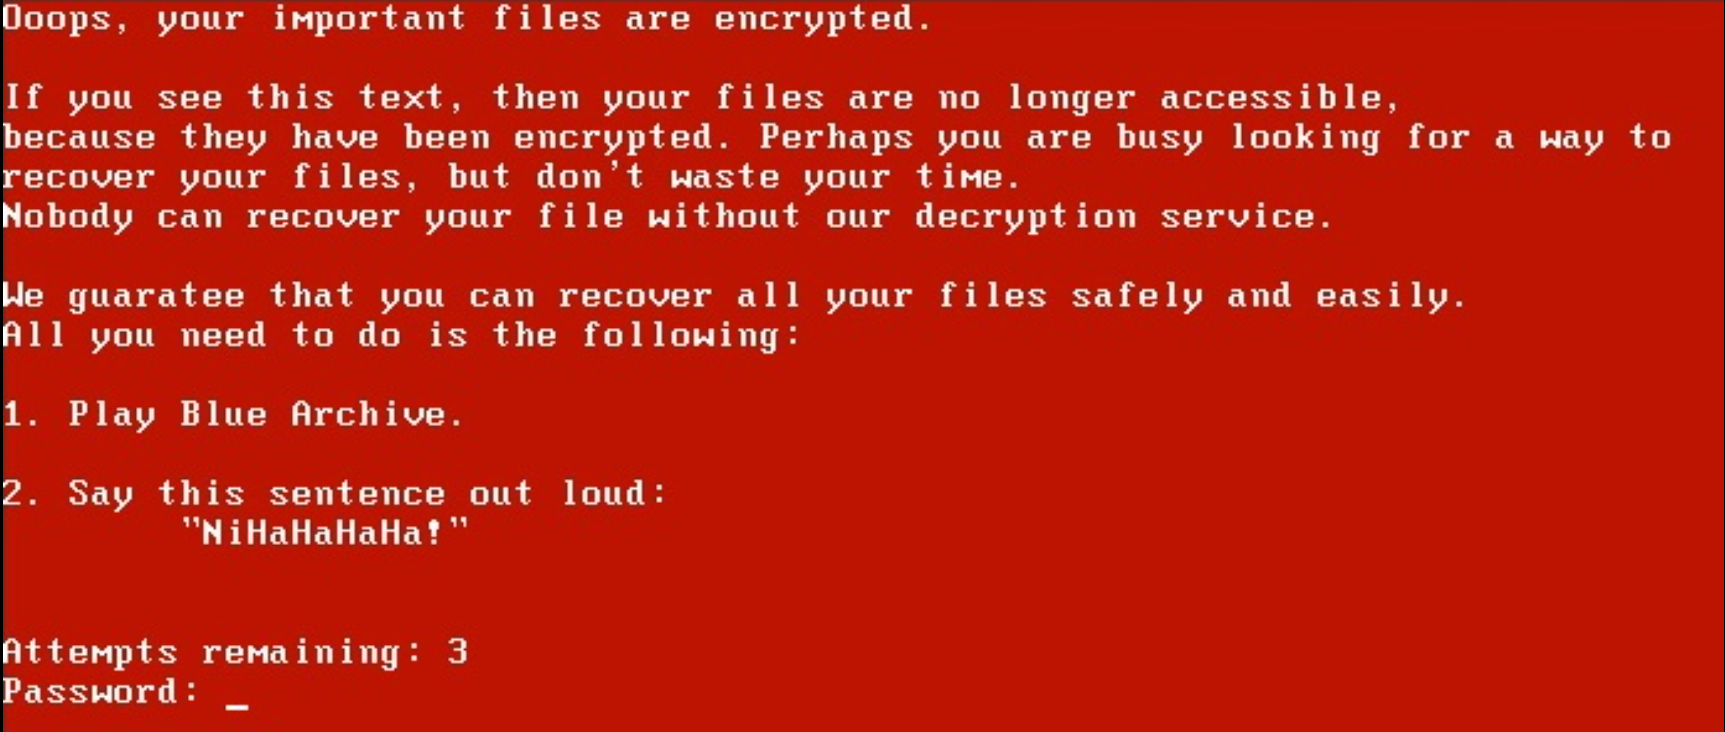
After rebooting again, the bootloader reads sector 60. Since the encryption flag is now present, the bootloader enters the login phase and displays the ransom interface:
Salsa20 is a stream cipher algorithm. If an invalid key is used for decryption, the encrypted MFT data would become corrupted and permanently unrecoverable. Therefore, a validation mechanism is required before decryption.
1 | |
The encrypted MFT data is decrypted only after the password passes validation.
The bootloader also restores the original MFT backup data from hidden sectors in case unexpected issues occur during decryption (for example, sudden power loss).
1 | |
After all restoration procedures are completed, the bootloader restores the original MBR, wipes its hidden sectors, and reboots the machine again.
At this point, the Windows login interface becomes accessible normally.
Undocumented APIs
Some Windows APIs are considered undocumented because, although they exist inside critical system libraries, they are either not officially documented on MSDN or are not intended for direct public use. NtRaiseHardError is one example. In this project, it is used to trigger a BSOD after the initial infection.
Note: There are many different ways to trigger a BSOD, such as terminating a critical process. If you are interested in critical process manipulation, please refer to this article.
To use undocumnted APIs, we first need to define their function prototypes.
1 | |
Next, we need to obtain their exported addresses from the DLL in which they are implemented:
1 | |
Lastly, we can invoke these APIs with the proper parameters:
1 | |
This demonstrates the basic workflow for using undocumented Windows APIs.

Many security researchers spend significant effort discovering and analyzing undocumented APIs. Doing so usually requires a deep understanding of the Windows kernel, reverse engineering, and advanced debugging techniques. These topic will be introduced in future articles.
Conclusion
Petya and NotPetya demonstrates a significant evolution in ransomware design by targeting not only files, but also low-level filesystem structures such as the NTFS MFT.
The developers behind Petya were clearly highly skilled. ALthough the malware itself was criminal in nature, studying its implementation provides valuable insights into bootloaders, filesystem internals, and low-level operating system behavior.
From a ransomware design perspective, however, Petya and NotPetya were less sophisticated in terms of victim communication compared to ransomware families such as WannaCry or CryptoLocker.
One major limitation is that the attackers relied heavily on email-based communication. In practice, this means their inboxes could easily become overwhelmed by victims, and the email accounts themselves could potentially be seized by authorities.
On the other hand, ransomware such as WannaCry and CryptoLocker communicate through the TOR network.
So why did Petya not do the same?
The answer is simple: implementing networking functionality inside a bootloader environment is extremely difficult.
Inside a bootloader environment, standard libraries such as <stdio>, <stdlib> and <socket> are unavailable.
What? You want to implement networking stacks and socket interfaces in a bootloader environment using Assembly? …Good luck!

This is probably my final article focused on analyzing Petya and NotPetya. I genuinely learned a tremendous amount from studying them.
If you have any suggestions or comments, please feel free to leave them.
THANKS FOR READING